|
Return
 Tutorial: Controlling Venetian Blinds in Maya Tutorial: Controlling Venetian Blinds in Maya
Author: Keith Legg
Email:
URL: http://www.perihelionvfx.com/
Level: Beginner to Intermediate
Description: This tutorial demonstrates a technique using a basic MEL (Maya Embedded Language) script to easily control a number of objects in a Maya scene. An example Maya scene file is included.
Maya is built on the concept of interconnected "nodes" of data. The reason for this is for flexibility and adaptability. In Maya's node architecture there are what we call attributes. If a node is to be useful in this system it needs to have compatible attributes with other nodes so they can share information down the (node) chain.
Software packages such as Photoshop, and many others, incorporate the concept of history. The user makes operations that stack up on each other over time and affect the outcome of the next command(s), and so on, until the desired result is achieved.
Maya also has a history which is directly tied into the idea of nodes, but is not exactly the same. The core of Maya's architecture is called the DAG which stands for Directed Acyclic Graph. Acyclic meaning the user connects the nodes together and thus defines the flow of information. Other packages like Lightwave and 3D Studio do the same thing internally, but may not allow the user to look at or change what is happening.
Maya is a very integrated environment. Nearly any of its components can drive any other. The color of an apple, for example, could easily be attached to the velocity of a speeding motorcycle, simply by finding and connecting the appropriate attributes.
A constraint is a way to clamp these attributes so when a maximum or minimum value is reached, it won't go any farther. The node will not allow the attribute to exceed the range in either direction.
Our goal will be to make a simple control handle for a scene that includes venetian blinds. We want to link the rotation channels of the blinds to a common controll so we don't have to select each one to open the blinds. We also want a constraint so they do not rotate 360 degrees since blinds do no do this in the real world.
Download the following Maya scene file. It is a 270 KB ZIP archive.
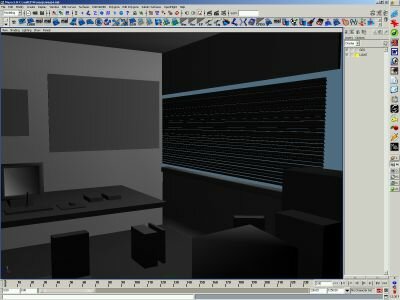
When you expand the ZIP file and load it into Maya it should look like this:
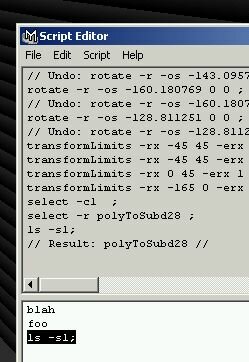
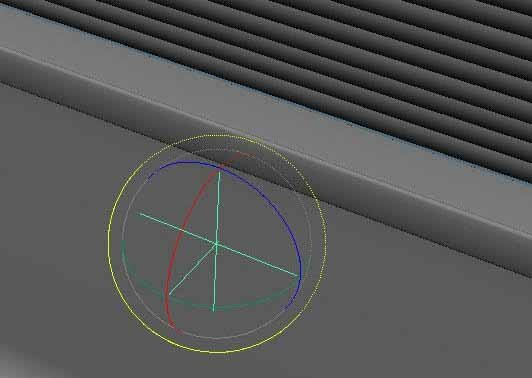
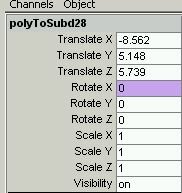
To get an idea of the rotation limits and axis we should be working with, select the blinds, then hit the "e" key to rotate them. Rotate them on the axis they would rotate on normally, and watch the channel box on the right of the screen to see which attribute we are affecting.
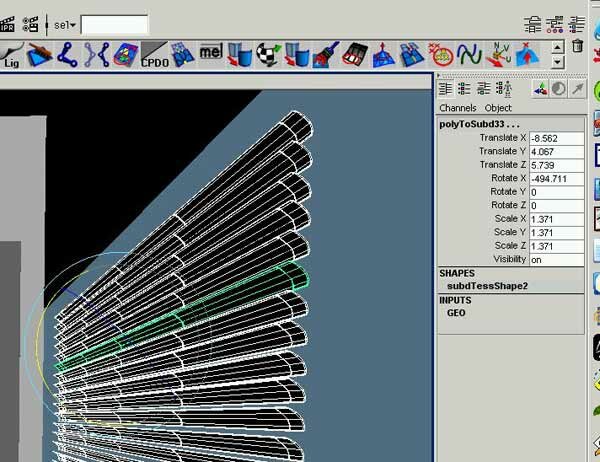
In this example we see that the Rotate X (rotateX) attribute is being affected. -494.7 is far too low because we have not put a constraint on that attribute yet.
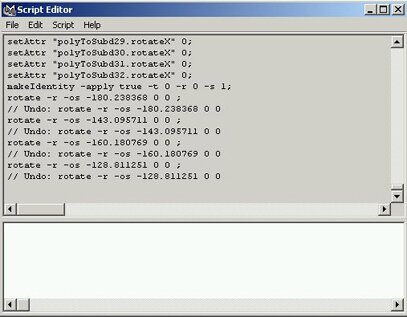
After rotating the blinds a little more we find that in this setup 0 is the maximum and -165 is the minimum. These numbers are a little odd, and of course it is all relative, but normally you would want something a little more logical like 0 to 180. This will work for now, and whatever the values, the important thing is that we know the minimum and maximum range.
The rotateX is just another channel to Maya, like color or velocity. When you animate something you are actually creating an animation curve node which drives the appropriate channels.
Open the script editor by clicking the bottom rightmost icon. We are doing this so we can be aware of what Maya is doing as we work. Also notice the commands we have been performing are listed in the script history.
Remember that our goals are to set a constraint and to make a rotationX handle for all of the blinds. There are going to be two steps to this. First, we will perform the actions as an "end user" using Maya's built-in tools, except we will watch the script editor to learn the Mel script command for the same action. We will then take these and write our own script to do the same thing many times and apply it to all the blinds.
We only want to perform the constraint and expression on the top blind for now, then get the command name from the script editor and write a script that will be applied to all the other blinds later.
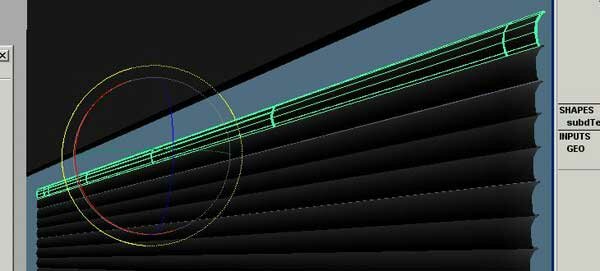
Select ONLY the top blind.
To set a constraint with Maya's interface hit CTRL A to bring up the attribute editor.
Make sure you are looking at the attribute for the transform node (leftmost tab), and you will see an option called Limit Information. Click the Rotate command to limit a rotation.
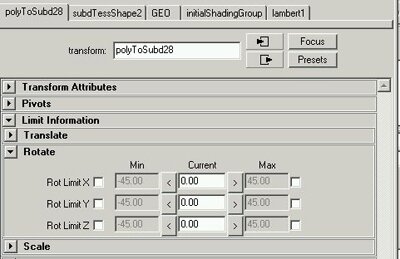
Watch the script editor as you set the constraints for the blind. It will repeat the same command "transformLimits" each time you change it. When you set it to 0 and -165 on x, the command in the script editor will look like this
transformLimits -rx -165 0 -erx 1 1 polyToSubd28;
Notice the last argument polyToSubd28 to the command is the name of the object.
With that in mind we could type the command over and over for each blind to set the constraints for each respective one, but that would be quite tedious. The same thing can be done with a few simple lines of Mel script.
To enter Mel commands into Maya just type in the bottom part of the script editor and hit the enter key on the numeric keypad of your keyboard to execute. Note that the normal enter key just moves to the next line like any text editor. You can also highlight commands and hit the numeric keypad enter to only execute those commands.
You may have noticed that Mel script is very similar to C language syntax, but our next concern is to set up a loop. A loop can do many things, but we just want ours to count from 0 to the number of things selected. There are only three commands we need to know in order to do this.
ls (the list command the -sl flag gets for the names of all items selected).
for (part of a loop constructor).
size (as the name would suggest this command gets the size of a variable).
We are also going to use the print command to to test our script at first to see if it is working.
Note: all of Maya's Mel commands can be found in the online help by hitting the F1 key.
If we type ls -sl (for list selected), Maya returns the name of whatever is selected. If nothing is selected it returns an empty string.
Lets make a string variable that is an array to store the names of what are selected. In Mel, to capture the return of a command we put it in single quotes ``.
All variables in Mel are marked with a $.
string $selected[] = `ls -sl`;
String is the data type of our variable and [] - denotes an array, meaning there can be more than one element to our variable. The ls command returns an array because more than one thing can be selected at a time.
int size = `size ($selected)`;
This tells us how many things are selected.
And finally the loop. In C syntax a loop has three parts separated by the semicolon ';'. The variable to iterate, the exception to break out on, and the action to perform for each iteration.
$a=0 initializes the variable.
$a<$size is the exception to exit the loop (Very important! If this is wrong the loop will never break out and your machine might crash!) What this says is to keep counting as long as $a is less than our size variable.
$a++ is the action to perform at the end of each cycle. $a++ is like C syntax for (a = a+1, or a++), which simply counts from a starting value one number at a time. For example, if $a had a value of "0" to start with, $a++ would equal 1 on the next iteration, then 2, 3, 4, and so on, until $a equals the value of the $size variable. At that time the for statement would "break out" and stop, or continue on to the next Mel statement. In short, the $a++ part of the statement increments the $a variable by one, and keps counting until "told" to stop.
So lets write our script.
|
// a Mel script to iterate through selected items
string $selected[] = `ls -sl`;
int $size = `size ($selected)`;
for ($a=0;$a<$size;$a++)
{//beginning of loop
string $name = $selected[$a]; // this variable accesses each element of select using $a as an index
print ( $name ); //this is to see what the name variable is
}//end of loop
|
If we copy this script and paste it into the bottom half of the script editor we can execute it by hitting ENTER on our numeric keypad.
Test it out by selecting the blinds and running the script. You will get a big messy string of characters like this:
pCube21polyToSubd14polyToSubd15polyToSubd1......
The reason the strings are all jumbled together is because we didn't tell Maya to put a line break in the print statement after each string is printed. To do this change the print line to
print ( $name + "\n");
"\" is the escape character telling the print command to treat the following character as a special command. In this case \n is for new line.
Any command we put after the print statement will be executed, and now that we have a structure where $name will be for all things selected we can just insert our commands here.
Remember our constraint command was:
transformLimits -rx -165 0 -erx 1 1 polyToSubd28;
but we want to substitute polyToSubd28 for our $name variable instead. Change the constraint command to:
transformLimits -rx -165 0 -erx 1 1 $name;
The last thing to do is add an expression to link the rotateX of each blind to a control object. We can make a locator for this.
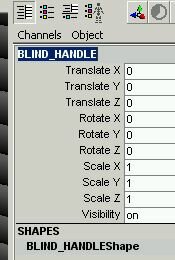
Go to Create -> Locator and make a locator. By default it appears at the center of the world.
Rename it to BLIND_HANDLE in the channel box.
Select only the top blind and open the expression editor by going to Window -> Animation Editors -> Expression Editor
Now open the expression editor and make an expression.
Type the following expression and hit Create.
rx = BLIND_HANDLE.rx;
You could also type
polyToSubd28.rotateX = BLIND_HANDLE.rotateX;
This basically tells Maya to link polyToSubd28's rotateX channel to BLIND_HANDLE's rotateX.
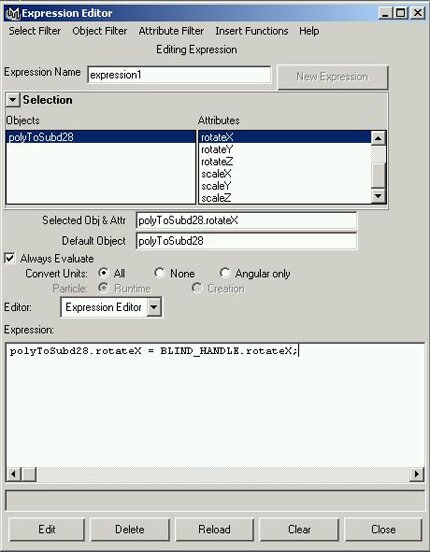
In Maya version 5 and up the channel will have a purple color indicating that channel is connected to an expression node.
If we look at the script editor we see the command executed to build an expression.
expression -s "rx = BLIND_HANDLE.rx;" -o polyToSubd28 -ae 1 -uc all ;
The -o means object and we see our polyToSubd28 again. Lets put this in our script and use $name instead.
The final script will look like this:
|
// a Mel script to iterate through selected items
string $selected[] = `ls -sl`;
int $size = `size ($selected)`;
for ($a=0;$a<$size;$a++)
{//beginning of loop
string $name = $selected[$a];
print ( $name + "\n"); // this is to see what the name variable is
transformLimits -rx -165 0 -erx 1 1 $name;
expression -s "rx = BLIND_HANDLE.rx;" -o $name -ae 1 -uc all;
}//end of loop
|
Paste it into the script editor and run it, making sure that the top blind is not selected. If it is it will crash the script because the top blind is already controlled by the expression we put on it. You will get an error:
// Error: Attribute already controlled by an expression, keyframe, or other connection: rx //
This could be avoided with a check before the expression command, but don't need to get that elaborate. Just know not to select something with an expression before running this script.
Select all the blinds but the top one and run the script.
After running the script we will see that all the things that where selected now have their rotateX channels linked to the control object and are constrained on the rotateX channel.
We can select and move our locator BLIND_HANDLE anywhere, but if we rotate it between 0 and -165 the blinds will follow the rotation.
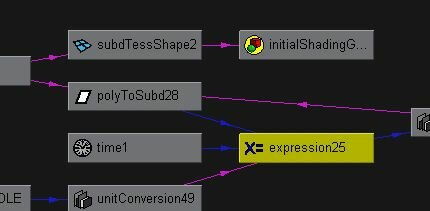
In closing, I hope this exercise encourages you to watch the script editor and be more aware of what's going on "under the hood" of Maya. You could also select one of the blinds and look at the nodes in the hypergraph to see the expressions we created.
The expression node is a very powerful way to establish logical relationships between maya DAG nodes with a simple programming language. Maya has over 600 different types of nodes, and you can create your own if you really want to get serious.
Modified: 12-06-03
|
